UIFlow digital input interrupt
-
50hz triac phase control with zero crossing timing synchronization. 100micro second timing tolerance or better. I ended up porting to Arduino/C++, too many limitations with UIFlow for now, python maybe to slow anyway. UIFlow is a good tool for higher level/basic control.
-
Hello,
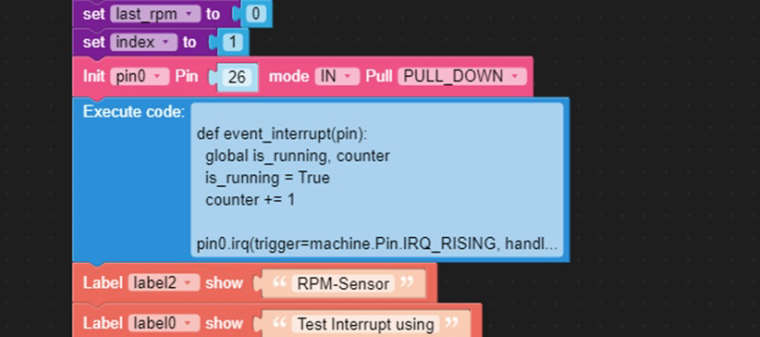
try an execute block, look at my code below.First i defined the two variables "is_running" and "counter".
In UIFlow i defined pin0 with GPIO26 as input with pull down resistor.!
Then i defined the event_interrupt(pin) - procedure. I use it for counting impulses at the GPIO26, therefore it is necessary to declare the variables as globals.Every second i read in the main loop the value of the counter variable and reset the is_running variable.
def event_interrupt(pin):
global is_running, counter
is_running = True
counter += 1pin0.irq(trigger=machine.Pin.IRQ_RISING, handler=event_interrupt)
-
@Gaviota
hello and thank you for your information.
Would you be so kind to post the full code?
It doesn't work for me - i always get a syntax error.Thanks in advance,
Schubi
-
@Gaviota
Hello Gaviota,
thank you for sharing this information.I tried to implement it, but i get an error.
Would you be so kind to post the whole program?Thank you in advance,
Schubi
-
@Gaviota
hello Gaviota,
i tried to run your code, but i always get an error.
Would you be so kind to post the full program so i can find my mistake.Thank yo in advance,
Schubi -
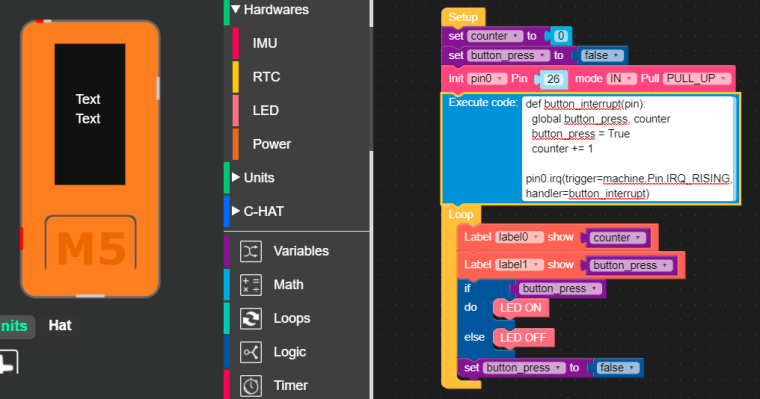
@Gaviota post was helpful to me. Thanks.
Below is an example of a N/O button interrupt, connected between G26 and GND.
Counter increments multiple times per button push.
This shows that software debounce could be necessary in many cases.
Cheers - BillT
-
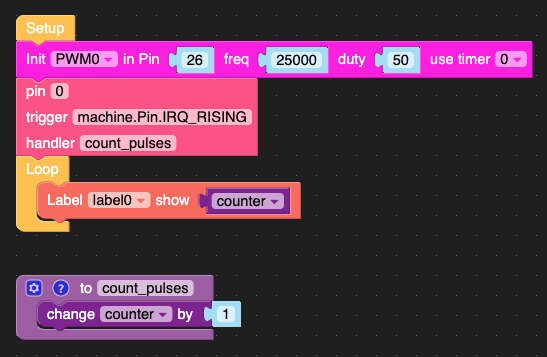
I've created a custom module to avoid the need to use the "Execute" block. It basically gives you a way to set the pin number, trigger, and callback for the IRQ. You will still create your own function using Blockly.
- Create a Variable: example "counter"
- Create a Function:
- Name it what you like, example: "count_pulses"
- Add single step from Variables: change counter by 1
- Init PWM0 with your desired pin, freq, and duty
- Load the attached file under Custom | Open *.m5b file
- Drag "PIN_IRQ" from Custom onto your workspace
- Set the pin number (just an integer, 0 for example)
- Set your trigger "machine.Pin.IRQ_RISING"
- Set the handler to your function from step 2 above "count_pulses"
- Add a label if you want and set the loop event to update a label with the current counter value
- It sounds more complicated than it actually is, check the screenshot
Your resulting code should look vaguely like this:
from m5stack import *
from m5ui import *
from uiflow import *
import machine

setScreenColor(0x222222)

counter = None

label0 = M5TextBox(146, 187, "Text", lcd.FONT_Default, 0xFFFFFF, rotate=0)

from numbers import Number

def count_pulses():
  global counter
  counter = (counter if isinstance(counter, Number) else 0) + 1

PWM0 = machine.PWM(26, freq=25000, duty=50, timer=0)
pin0.irq(trigger=machine.Pin.IRQ_RISING, handler=count_pulses)
while True:
  label0.setText(str(counter))
  wait_ms(2)
Have fun storming the castle!
-
@lyledodge I can’t see attached file. Is there any or it problem with my iPhone?
-
Hi @Gaviota.
Currently I'm still learning to use UI Flow IDE and I want to crate the same thing- counting pulses and showing them on the screen. Can you send me your Blocky?
Thanks,
Bozho -
A digital input interrupt in UIFlow is used to respond instantly to changes in the state of a pin, such as the pressing or releasing of a button. Instead of constantly checking the pin, you set an interrupt on a chosen GPIO with rising, falling, or changing detection. The callback function is triggered by this event, making your program more efficient and responsive to real-time input without using excessive processing power.
-
@bozho did you have any luck. It is clear on Uiflow1 how to detect rising inputs but I don't see this on Uiflow2...or is this is actually what is meant by the 'button press' block on the 'pin button' hardware module?
Hello! It looks like you're interested in this conversation, but you don't have an account yet.
Getting fed up of having to scroll through the same posts each visit? When you register for an account, you'll always come back to exactly where you were before, and choose to be notified of new replies (either via email, or push notification). You'll also be able to save bookmarks and upvote posts to show your appreciation to other community members.
With your input, this post could be even better 💗
Register Login